There are hundreds of millions of Facebook groups.
From car enthusiast groups like Miata Club (27,964 members) to entrepreneurial
support groups like Women Helping Women Entrepreneurs (37,406 members) to buy and sell groups like Orlando Online Yard
Sale (53, 184 members), Facebook groups
are used for many different purposes, but they all have the ability to create a
community around their topics.
These groups are a new frontier for business owners looking
to build and manage a community around their brand. They can help you position
yourself as an industry expert, find new customers, and more.
In this article, you’ll discover
how to use Facebook groups to support and market your business.
Why Should You Create
Your Own Facebook Group?
While participating in Facebook groups managed by other
people can assist in promoting your business, there will always be rules in
place and restrictions.
Managing your own group allows you to control
the entire group experience and use
the group for a specific purpose.
Here are some ways that business owners use Facebook groups:
- Create a community
around products – Many groups are created by businesses as a bonus when
someone buys their products or services. Creating communities around the
products and services you sell makes members feel exclusive and provides an
area where they can get additional help and training from you.

- Establish authority
– Some businesses create a group for email subscribers to further inspire and
educate them with helpful posts and prompts. This is a place where you can
share helpful articles, tips, tutorials, etc. that will help improve the
member’s lives and position your business as an authority and someone they can
trust.
- Create a topic-focused
community – Rather than building the community around your products or
services specifically, having a community on a specific topic on which you’re
an expert can also enhance your brand. For example, the camping and outdoor
retail chain, REI could have a Facebook group catering towards people who love
camping in which they can share knowledge (and links to their products).
How to Set Up a
Facebook Group for Your Business
Once you know what purpose your group will serve for your business,
you can start to build it.
Here is a quick breakdown of the steps:
#1 Create a Group
Click on Create a Group on the main Group page
we accessed from the left-hand side of your Facebook personal profile.
You’ll then see a screen where you give your group a name, add
people, and set the group’s privacy level.
You’ll need to add
at least one person to your group before you can create it. Choose
someone who knows you’re building the group but will keep it under wraps until
you’re ready to launch.
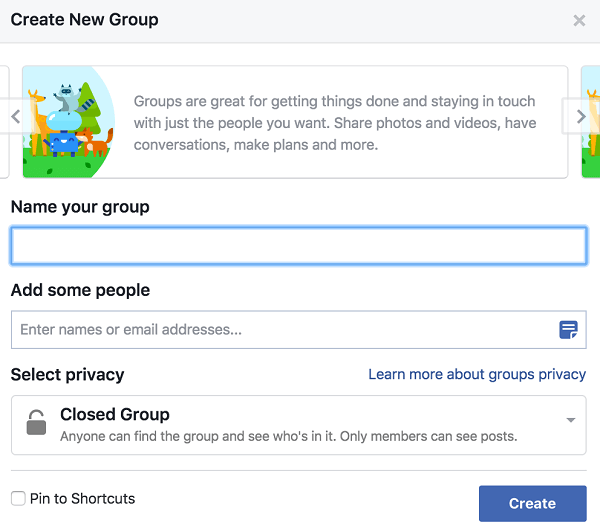
Facebook groups can be public, closed, or secret, depending on the goal of your
business.
- Public means that
anyone can find and join your group.
If you decide to build a Facebook group community around a certain topic or
event, a public group may work well. Just beware that others will join the
group in an attempt to promote themselves.
- Closed means
anyone can find the group and ask to join, but must be approved by the
administrator. The public cannot see the group’s posts until approved.
This is helpful because you can educate your members without giving everyone
the ability to see your tips or training. The closed group is the most popular
for business.
- Secret means only
members can see the group posts and it cannot be found in search. Members will
need to be added by the administrator.
Secret groups are for very specific members and are often centralized around a
service you provide like high-level coaching. You can even have people pay a
monthly fee to join your group.
#2 Customize Your
Facebook Group
Add a cover photo that’s
828 x 315 pixels. When the image shows on the group’s timeline, click on it to create a thorough description and the rules for
your group.
Now click on the ‘…’ button to complete
the Settings options for your group.
From here you’ll include your group’s…
Once your group is set up the way you want it, add three to
five posts so new members have something to read.
Make sure one of those posts is a set of rules that members
should know, then pin that post to the top of your timeline. This will help you
save time because the rules are clear and agreed upon.
#3 Invite People to
Join
After your group is up and running, it’s time to invite
people! Focus on people your group
serves and find out
where they are.
Here are some options when you’re starting to invite people
to your group:
- Add an invitation on your website to allow visitors to join
your group.
- Send your email subscribers an email introducing your new
group and give them a link to the group’s page.
- Share the link to your new group on all of the social media
platforms you’re active on.
- Add a social button on your website that takes people to
your group’s Facebook page to join.
- Include an invitation to join your group on the thank-you
page for your lead magnet.
#4 Create Content
& Engage
Before launching your group, it’s important to think about
what type of content is needed and define a long-term content strategy that
supports the group’s goal.
If your group’s goal is to sell to members, you might choose
a certain type of content strategy, whereas if the goal is to create a support
group for members who have already purchased, you will have a different strategy.
The important thing to remember when publishing content for
your group is that it should always bring value to the group. Value can be an
interesting article, an educational tripwire, or even a fun challenge for
members to do.
You want your group to be a lively place where conversation
is natural. Here are some ideas for engaging content:
- Challenges:
Challenges have become a very popular activity inside groups. An example of
this would be if you run a photography workshop, you could design a challenge
centered around photography and invite members to join in. At the end of the
challenge, invite them to work with you one on one if they’re ready to take
their learning to the next level.
- Tutorials:
Tutorials are a great way to continue establishing your business as the leader
in the industry. Each week post a tutorial video that seeks to help and support
your members.
- Live Q&As:
The live question and answer type activity has become popular in larger groups.
As your group grows, you can offer a Q&A session once a week to continue to
help and support your group members.
- Polls: Polls are
a great way to quickly gauge what type of content your group wants more of.
Create polls for your next blog title, logo, or type of content for the next
month.
Summary
Groups are a powerful way to establish your industry
authority and knowledge, create an engaged community, and find new customers.
These groups do take a significant amount of time to run and
manage. Many businesses that choose to run Facebook groups hire a Community Manager - someone who can
monitor posts and comments as your group grows and becomes more active.
If you’re interested in learning more about Facebook groups
and seeing if creating one would benefit your business, call us today at (407)
682-2222 for a free strategy session.